iPhone 101: Understanding Distribution (Pt II of II)
In Part I of our distribution learnings we learned important lessons like the importance of mapping our certificate request to the same name in the iPhone Developer Portal, the differences between Agents and Admins and Developers (oh my!) and the answer to the all important question: “What should I set my bundle identifier to?”
Now in Part II of understanding iPhone distribution we’ll uncover provisioning for ad-hoc applications and prepping an application for final deployment on iTunes Connect.
Provisioning
So I’m assuming if you’ve clicked this far you’re still with me? Nothing too confusing? Awesome. I know it’s been a long ride… but nothing too hard so far. Why I daresay we haven’t even seen a line of code yet.
For the next step, we need to set up a Provisioning Profile on the iPhone Developer Portal. A provisioning profile is basically a file that states three things:
- Which application we want to test.
- What developers are allowed to compile this application.
- What devices are allowed to install it once compiled.
So you already have your developers lined up… now you need to add the devices, right? Remember, you’re going to need to be an Admin for this. Click on the “Devices” tab in the iPhone Developer Center. You’ll need to add the devices’ unique UDID, which in itself is a pain. A quick tutorial for getting the UDID of a device can be found here.
At Big Spaceship we set our devices up by the full name of the owner of the device along with what kind of device it is. In some small way we feel this helps to know what sort of balance of 1st generation, 3G and iPod Touches we have out there.

Once you’ve got all the devices set up, you can at long last create a Provisioning Profile. Click to the Provisioning tab on the iPhone Developer Portal and then click “Add Profile” in the far left. Give your profile a name and then select which application, developers and devices are to be added. Once you’re finished, click submit and after a page refresh or two it’ll generate a file for you to download with a .mobileprovision extension. Well done!
Jump back to XCode and open your Organizer window (Window->Organizer). Drag the mobileprovision file into the “Provisioning Profiles” tab and you should see a new icon with your application name appear underneath the tab. Clicking this icon should reveal some information about the application, like how many devices are included and the application identifier. If you see a big yellow bar at the top of the screen with an error stating “A signing identity matching this profile could not be found in your keychain”, you’ve probably messed up your Common Name in the Developer Certificate. Go back to Keychain access, delete all the keys and certificates and start over. Don’t get too frustrated; this took me about a half dozen times to really wrap my head around.
Assuming all is well, now we need to edit some build settings. This is easily the most intimidating part of the process. Open your project, then double click the project name at the top of the “Groups & Files” tab on the left side of the code window in XCode (you can also go to Project->Edit Project Settings). This will pop open a window that looks sorta like this:
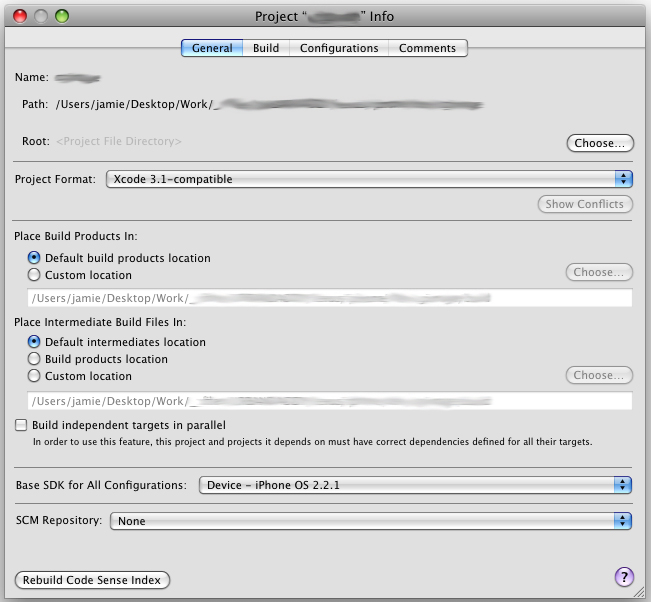
I emphasize looks “sorta” in that last sentence. The important thing is that it has the same tabs at the top of the screen, not that it identically matches. I’ve seen a couple of different variations on this general screen on my own machine and have no idea what causes different things to appear. Just imagine the wrath Adobe or Mozilla would feel for this sort of inconsistency…
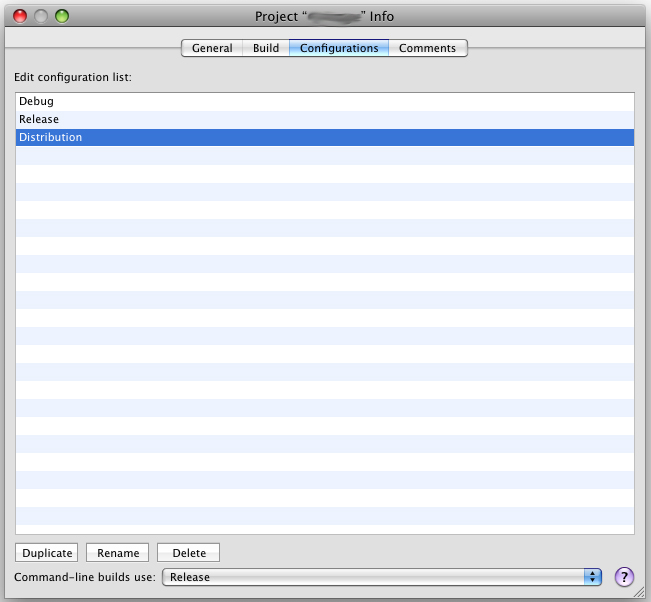
Anyway, click on the “Configuration” tab at the top. It’ll switch to look like this:

Duplicate your “Release” settings and call it whatever you like. I call it “Distribution” since that’s what I’ll be doing with this build… distributing it. Why duplicate instead of modify “Release”? So if we screw something up we can always delete our modified version and start over. :) It should look like this:
Now click on the “Build” tab. This is the crazy one.

Okay, don’t have a panic attack. It’s going to be okay. Second, don’t worry if the information you see here isn’t exactly the same as mine. The most important things to get right are:
- The “Configuration” dropdown is set to Distribution, or whatever you named your new configuration.
- The “Code Signing Entitlements” says dist.plist. You will have to manually type that in. We’ll deal with what this means in a minute.
- That you select the “Code Signing Identity” to “iPhone Developer: [Your Common Name Here]”. This is basically telling XCode to use your Development Certificate we set up in Part I of the tutorial.
If you don’t see your Development Certificate, that means something is wrong. Maybe you typed the Common Name wrong back when you requested your certificate from Keychain Access? Or maybe there are extra keys in your keychain from a previous mess up? Perhaps the provisioning profile you downloaded from the iPhone Developer Center doesn’t allow for your certificate to develop with it? Try checking and redownloading the mobileprovision.
If you see something close to my screenshot, you’re gravy. You can close the window.
At long last, we’re ready to compile… except for that whole “dlist.plist” junk. So what is that and why do you need it? It’s an extra curveball Apple added (or forgot about, technically). I don’t totally understand why Apple doesn’t just set this automatically, but for whatever reason, there’s this one checkbox that you have to manually tell the compiler to deal with. To do that, select “File”->”New File” and choose “Entitlements” from the “Code Signing” tab. Name it “dlist.plist”. This file – henceforth referred to as the Entitlements plist – needs to be in the root of your project, don’t add it to any nested groups or anything like that.
Apple’s documentation says that you’re SUPPOSED to uncheck the only setting (get-task-allow) inside the Entitlements plist, but for whatever reason that breaks my compile. So you’ll have to see what works for you. If you go to test your application on the phone and it gives you some sort of error stating that the connected phone is not allowed to install the application, try toggling that get-task-allow setting off (or on).
Okay so you’ve got your Entitlements set up correctly. At long last, you’re ready to put the application on your phone!
- Connect your device to the computer
- Set your active configuration to “Device” -> “Distribution” (or whatever you named your custom configuration)
- Compile
Make sure you’re not syncing and your phone isn’t locked when this happens, just so it’s dedicated to installing. Not only will the application run on your phone but it’ll also send any NSLog’s back to the Console! Pretty frikkin cool. You’ll notice some lag, performance decrease and instability when tracing back to the Console. Keep this in mind for builds you send off for QA and final deployment – tracing is bad.
For all the other devices on your provision, you simply need to locate the .app file created from compile (usually located in YourProjectDirectory/build/Distribution-iphoneos) and send ‘em that along with the .mobileprovision file. To install, they simply need to drag the application and the mobile provision file into their iTunes Applications folder and sync as normal.
And yes: Adding new devices for testing means you’ll have to generate a new mobile provision, add it in XCode and recompile. Often I need to check my Build panel just to ensure the Code Signing Identity didn’t get forgotten somehow.
Before testing you should always delete the previous installation of an application and restart your phone. Why? Because any residual memory leaks from your last build might affect the performance of your current. QAing memory leaks when you might have leftovers from the previous build is sort of like looking at a cached version of a web site for bug fixes.
Prepping for Distribution
So you’re done being excited about testing and have actually produced a decent application, ready for the app store? Awesome! Now the next step is to prep for fullscale deployment.
You’ll need to generate another certificate request. This time we need a Distribution Certificate. Distribution Certificates do the exact same thing as a Developer Certificate except they don’t have a mobileprovision file. Instead they have something voodoo in them that allows the App Store to install in any Apple approved device. So we need to request a certificate from an authority through Keychain Access just as we did in Part I, but this time you need to name it your application (or company) name. In the iPhone Developer Portal your Agent will need to go to the “Certificates” tab and click the “Distribution” sub-tab, upload and approve this new certificate – as if it were a regular Developer certificate. This will generate that elusive Distribution certificate. Like before, you add this to your login keychain by double clicking the resulting file downloaded from the portal. From there, switch to XCode, click back to that scary Build tab and change your Code Signing Identity from “iPhone Developer: Your Name” to “iPhone Distribution: Company Name” and remove the dlist.plist from your Code Signing Entitlements.
Clean your build, remove any NSLog commands and recompile. As before, a .app file will emerge in your build project’s build directory. This .app is what needs to go to iTunes Connect. Note that this is the final app and since it has no provisioning profile you won’t be able to just drag it onto your phone to test – it doesn’t know your device any better from any other out there.
iTunes Connect
For some inexplicable reason Apple has set up a completely separate service for submitting applications to the App Store. This service seems to have no tie whatsoever to the iPhone Developer Portal… it doesn’t sync users and has totally different nomenclature for permissions. This is extraordinarily frustrating and confusing.
There are three permissions to iTunes Connect:
- Admin. Yep, same nomenclature with different permissions on a different service. Awesome. In this case, Admins have the ability to add, modify or update applications and track all the financials and metrics. Admins can also create the Financials and Technical users. The Agent from the iPhone Developer Center is the default admin.
- Finance has access to all the financials and metrics, but no ability to create and manage applications.
- Technical users can create and manage applications but can’t see the financials.
As someone with Technical or Admin permissions, click on Manage Applications. Fill out all the meta data required… the SKU can be anything you want. If you’re not sending any encrypted stuff, don’t sweat stating “NO” to the big scary legal prompt asking you about it.
IMPORTANT! There is a text box somewhere along the way with an extremely cryptic description: DEMO ACCOUNT – FULL ACCESS. This is your opportunity to provide Apple with any documentation on specifics for your application. For example, if you’re hiding information behind some sort of password or you need a username/password to log in, provide Apple with a way to test these things here. This will help expedite the review of your application.
Apple requires that you submit your .app file zipped up. In a .zip file. All by itself.
Apple also expects all your QA to be done so if there’s a bug and you need to resubmit later, the whole review process starts over. On the whole it averages anywhere between 2 days and 2 weeks for review to complete. In a tight deadline this inevitably puts you in the unenviable position of deciding between missing a launch date with the perfect application or going live with a buggy one, so really schedule as much time as possible for testing.
Once Apple approves your application they’ll send an email stating it’s “Ready for Sale”. Awesome! A short time thereafter it should appear in the App Store. Crack open the champagne!
In Summary
So let’s see if we can wrap the two tutorials up into a few concise sentences.
On the iPhone Developer Portal we create a team consisting of an Agent (the original account holder), Admins and Developers. The Admins create an application ID, which is matched in XCode so the application can sign correctly. Developers request and download their certificates, which allows them to compile for anything beyond the iPhone Simulator. Developers can download and install the provisioning profile Admins create, which contains a list of allowed devices for ad-hoc distribution. Finally, Agents create a special Distribution certificate so the app can be submitted to the store.
In Keychain Access we can request Developer or Distribution certificates, which are then sent up to the iPhone Developer Portal for approval by an Admin or an Agent. We’re very careful to spell things correctly and delete any excess keys.
In XCode we drag the provisioning profile to the Organizer panel, set our bundle identifier to match the application ID from the iPhone Developer Portal in the Info.plist, create an Entitlements plist file, and ensure that we are code signing with the correct certificate specified in Keychain access.
In iTunes Connect, users with either Admin or Technical level permissions can submit an application to the store. We need a bunch of meta data, some screen shots, documentation telling Apple how to unlock any hidden or password-protected sections and a zipped up version of our application which has been compiled with a Distribution Certificate (not a Developer Certificate) and the Entitlements plist file removed.
Complicated? Yes. Worth it? Totally.
Note: This article was originally published on Big Spaceship’s blog. Links have been adjusted for posterity.