iPhone 101: Understanding Distribution (Pt I of II)
When I first started dabbling with Objective-C and iPhone development I found the entire learning process cumbersome and frustrating. In fact, many days I still do. Often Apple’s documentation seems dated, complex or difficult to find. The hangover of the NDA from the early era of iPhone development still lingers – there is a dizzying amount of information to consume and understand before you can develop for this phone.
I’d like to start sharing some of the learnings I’ve had along the way. Not every solution I’ve come up with is perfectly in tune with the patterns the Objective-C community or Apple recommends. I’m coming at iPhone dev from the angle of a self-taught programmer, someone who cut their teeth on JavaScript and ActionScript and now has stumbled onto something a little more complicated. Hopefully these articles will help me and the community at large to better document and understand this exciting new territory.
I’m going to start with an extremely important topic that has a great deal of conflicting information online and doesn’t require a lick of code knowledge: Apple’s certification and distribution procedures. In order to test anything on a phone or submit for review to the App Store, one must follow a very specific set of steps. It’s not as easy as hitting the “Publish” button or uploading a file to some server somewhere.
This two-part tutorial will cover common got-yas and some important notes on 3rd party development, so I highly recommend giving it a gander if you’re green to the whole iPhone app store process. Part I covers generating a valid development or distribution certificate. Part II covers provisioning devices, iTunes connect and pulling everything together.
Certificates 101
There are three different kinds of certificates to an iPhone application. The first is the Apple Worldwide Developer Certificate (WWDC). This can typically be downloaded from Apple’s portal, though I have seen strange 404 errors attempting to do so before. I’m not certain if it’s globally shared (I think it is) and if so will be happy to mirror it on our site to help ensure it’s at least somewhere on the Internet. This certificate is compiled alongside one of the other two kinds of certificates: either a Developer certificate or a Distribution certificate. These are used for testing applications and deploying to the Apple Store, respectively.
In order to understand how one uses these certificates, we need to understand the process for generating and administrating them. Creating and utilizing the certificates is a funny song and dance between the iPhone Developer Portal, Keychain Access (an application on your Mac) and XCode.
The iPhone Developer Portal
The iPhone Developer Portal is a web site used to manage all of the various build settings for an application. Before you can even begin to think about testing an application on the phone you need to understand this site. To begin with, let’s discuss the three different permission levels members of your development team can have: Agents, Admins and Developers.
Upon purchase, the account tied to the purchase of the license becomes the team’s “Agent”. Changing this requires getting in touch with Apple directly, so make sure that your agent is someone accessible or their password can be freely distributed amongst your company. You may need it later.
Agents are sort of like superadmins. They have the ability to create new projects, add devices for ad-hoc provisioning, approve & create development or distribution certificates and control the privileges for other team members. They are also the main administrator of iTunes Connect, the portal for submitting applications to the App Store for review. We’ll cover that more in a bit.
Admins have all of the access to do everything discussed above except they cannot create distribution certificates. An agent can email an Admin (or a developer, for that matter) a distribution certificate.
Developers have access only to request a developer certificate. Each developer is supposed to have a unique developer certificate, though this too can easily be shared.
Adding members works very similar to a social network: You simply invite a person via a form on the portal to contribute to your team. I haven’t attempted to put the same email address on multiple accounts, but I have a feeling that an email address is uniquely tied to that team. This means that if you have multiple iPhone Developer accounts – and as we’ll soon learn for 3rd party development, this is a must – you will need a new email address each time you kick off a project with a developer on it.
Application IDs
So let’s pretend you’re setting up your first project for ad-hoc distribution and that you’re given Admin access. The first thing you need to do is create a new application ID. Like Adobe AIR (or ActionScript class packages), each application ID is required to have its own unique namespace that looks something like com.yourcompany.YourApp. You can set this to whatever you like, though I have seen issues (the app won’t compile, etc) with any namespaces more than three levels deep. Also, in order to ensure that there are no conflicts whatsoever, Apple generates a random string before your namespace, so the final output will wind up looking like ABC123.com.yourcompany.YourApp. As a final note, you can use * to denote that you’re going to use a global namespace which will allow you to easily construct new unique applications without having to go back to the iPhone Developer Portal each time. We use *com.bigspaceship.**, for example. Just seems easier to deal with.
IMPORTANT! One important thing to understand about application IDs is that because they are given a uniquely generated namespace there are massive implications for 3rd party iPhone development. You cannot (as far as I can tell) transfer this unique ID to another party. If you’re building an iPhone application for a client and they own the source code, it is highly recommended they acquire their own license and you build as a member of their team rather than generating an application ID on your space… unless you plan on being responsible for their app store submission for all future updates.
Once this application ID is generated, jump into your Info.plist file for your project in XCode. Set your bundle identifier to com.yourcompany.YourApp (if you used a wildcard, you can set it to com.yourcompany.WhateverYouWant). Do not add the random string Apple generates. Apparently in older versions of the SDK you needed this, but it will confuse the compiler now. The application ID in your Info.plist must match the namespace on the iPhone Developer Center or you’ll get weird errors.
Generating a certificate
Now since you know we’re testing, you need a developer certificate. The first thing you need to do is crack open Keychain Access. If you’ve never opened it before, it looks sorta like this:
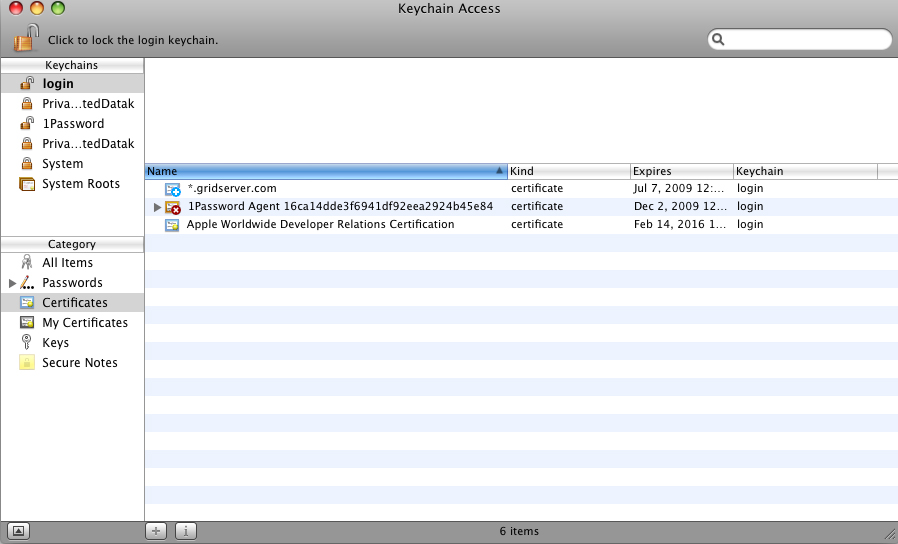
One thing that tripped me up for awhile is that the “Keychains” header in the top left of the application is actually sort of like a folder. “Category” underneath it is like a subfolder of that. So selecting “System”->Certificates is going to show me a different list than “login”->Certificates. We’re going to be dealing entirely with the “login” folder, so always make sure that’s selected. Oh, and we’ll jump in between the Certificates and Keys categories a good deal here, too.
In the upper right corner of your screen next to the Apple Logo, choose “Keychain Access”->Certificate Assistant->Request a Certificate from a Certificate Authority. The form you fill out needs to exactly match the information on the iPhone Developer Portal. If your name on the portal is spelled all lowercase, spell it all lowercase here. This is an extremely important step.
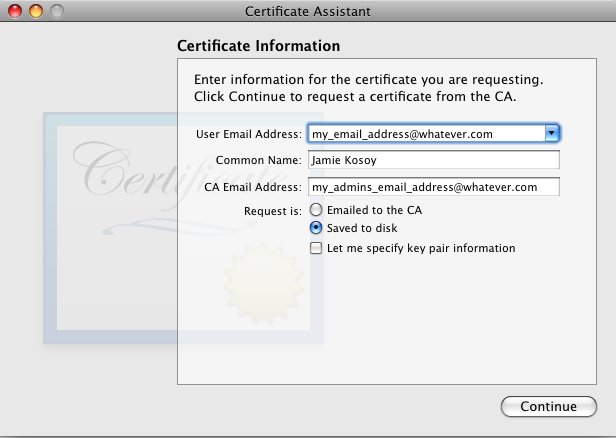
The CA Authority email address should be the email address for either the Agent or an Admin on your iPhone Developer portal. If you’re an agent, go ahead and fill out your own email address. Select the “Saved to Disk” option and save it on your desktop. You can name the file whatever you want to, we’ll only need it for a few minutes.
To verify that things are going well, jump to the “Keys” category in KeyChain assistant. You should see a public and private key for your common name.
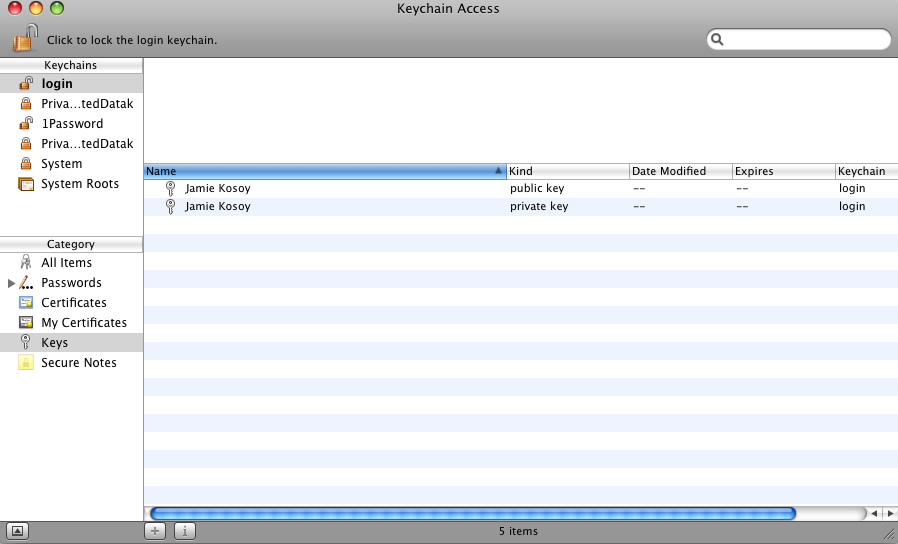
If for whatever reason you screw up your common name or email address or it just doesn’t work, you must destroy these two keys by simply selecting and deleting them. Once you do that you can create a new certificate request by following the steps earlier.
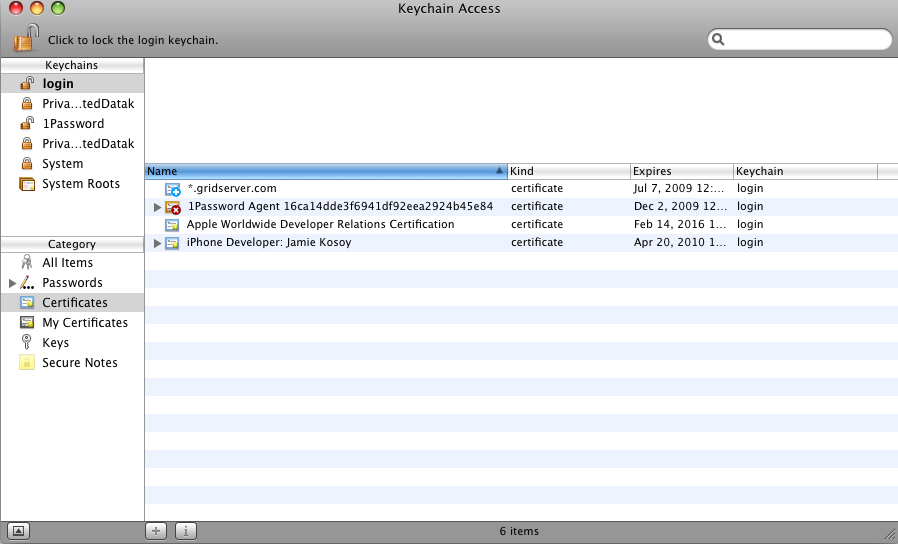
Jump to your iPhone Developer Center and upload your certificate request. If you’re an Admin go ahead and approve it right away, if not go yell at your admin to approve you. Within a few moments (admins: refresh the page a few times) you’ll have a certificate to download. Download it, double click, install it to “login” and you’ll see a new pretty certificate in your “Certificates” category.
IMPORTANT! You should strive to only keep one developer in your keychain access at a time… XCode has been known to get a bit confused when attempting to compile with multiple certificates in the Keychain. But be warned! Deleting a certificate cannot be undone. Don’t delete a certificate before you’ve exported it. To export, simply click on the “Certificates” category, right click your certificate and select Export. Follow the instructions on screen and save the file wherever you want. To reinstall the certificate simply double click… if you’re savvy you’ll notice the Public Key is gone for good in the “Keys” category, but it doesn’t seem to affect anything so don’t worry about it. This is also useful to know for 3rd party development. I have a folder with a whole slew of different certificates depending on the client, so I can add and remove as needed.
Note: This article was originally published on Big Spaceship’s blog. Links have been adjusted for posterity.